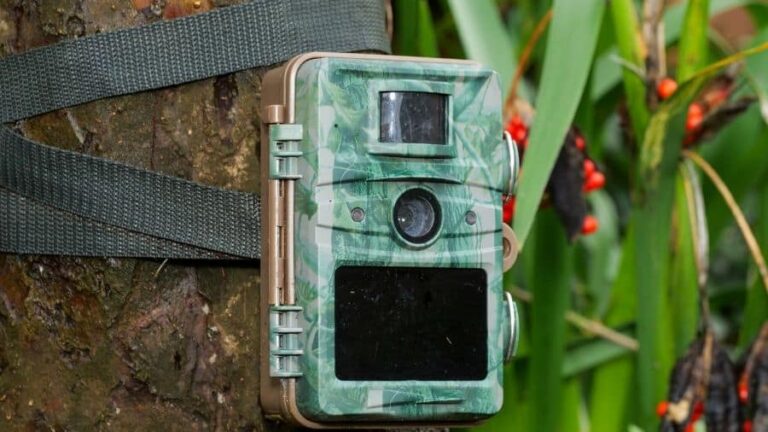
Why Does My Trail Camera Take Pictures of Nothing?
Trail cameras are designed to remotely capture pictures or record videos of targets in their field of view on detecting their motion or body heat. It could be very possible that your trail camera could just be taking pictures of nothing or, things that you did not place it there to take. The question then arises: why does my trail camera take pictures of nothing?
The main reason why your trail camera is not taking pictures is due to product failure or settings error. Product failures are mostly caused by a faulty PIR sensor or what is commonly referred to as ‘a run-away’ PIR, while settings errors are usually caused by the user.
Most times, during the summer period, it is more difficult for the PIR sensor to operate optimally due to the extreme sunlight and heat. For instance, if there is a direct sunlight reflection on tall trees or tall grasses, the surface of the grass and leaves will be hotter than the ambient air temperature and this could result in a false trigger of the PIR sensor and the camera will take a blank photo. In the rest of this article, we will provide you with useful and interesting information about why your trail camera may be taking pictures of nothing; let’s roll!
Why is my trail camera not taking pictures?
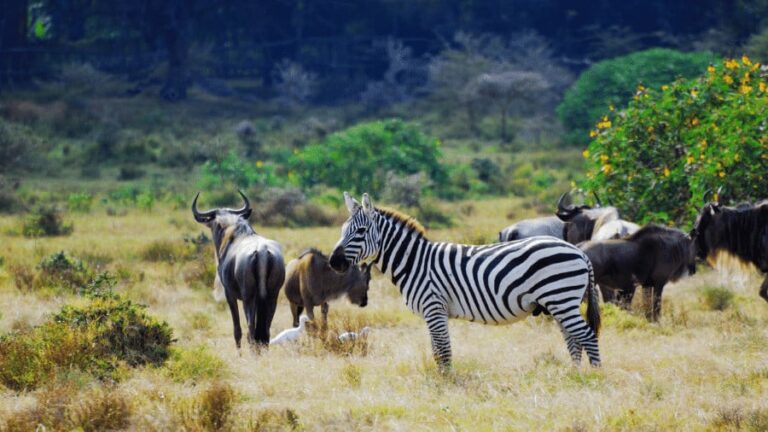
It is very rare; in fact, almost impossible to see any trail camera with an SD card that does not have a lot of pictures taken out of false triggers. Many trail camera users whether for home security or animal hunting/watching have complained that it could be very frustrating searching for a good picture amidst hundreds of falsely taken pictures having it in mind that there might be a reasonable one hidden somewhere in between the false taken ones. Imagine the frustration!
What then is the major cause of ‘blank photos’ or what we refer to as false triggers? The cause could range from a lot of things; some of those things might not really seem necessary for you, they are things that are mostly neglected. It could be as a result of ‘product failure’ that is, how the camera was programmed. It could also be caused by ‘settings errors’ that is, how the camera was set to fit its surrounding environment.
We will now look at these factors that cause blank photos for a better understanding and then proffer solutions on how best they could be prevented.
As stated above, we have majorly two of them which are:
- Product failure.
- Setting errors.
Product Failure
Definitely, most technology products could be very helpful and could help to ease a lot of stress just like the trail camera. Just as you enjoy the services of these products, also have it at the back of your mind that these products are programmed to function the way they are; any wrong command might result in the malfunctioning of that particular product.
As mentioned earlier, false triggers/blank photos occur mostly as a result of product failure which is usually caused by a faulty (Passive Infrared Sensor) PIR sensor or what is commonly referred to as ‘a run-away’ PIR. When an element inside the PIR sensor fails, it reflects a constant difference in the IR radiation readings which triggers the camera. This is relatively common with trail cameras that operate with ultra-sensitive PIR sensors manipulated by voltage and circuitry. As a trail camera user, it is very necessary to access your camera if you think you have a camera with a faulty PIR sensor, the process of access it is not something you should be worried about, below are the steps to take so s to avoid flash triggers:
- The first step is to format the SD card so it has no photos on it.
- The next step is to set the camera to ‘photo mode’. The essence of this is to be sure that your camera is strictly going to take pictures only and not videos so as to have enough space to capture other targets within the landscape.
- The next step is to set the trigger delay to a short time: less than 30 seconds. The essence of this is to avoid unnecessary shutters.
- The next step is to power the camera on to the operational mode.
- After that, place the camera in an environment where there is no movement of any kind so that it will be impossible to record any trigger events. for clarity sake, it could be set in a cabinet with closed doors directly opposite a wall such that the camera lens and PIR will be facing another wall.
- Allow the camera function for 5 minutes or so.
- After performing all the above steps, when you retrieve the camera and view the photos there should only be a photo of you showing when you placed the camera down and when you picked it up. If you come across several photos on the camera with a time difference matching the trigger delay the camera has a faulty PIR sensor.
Settings Error
Surprisingly, a lack of understanding of simple trail camera programming is somewhat common and often the cause of what people believe to be false triggers. Setting up a trail camera is not as easy as it seems, there are a lot of procedures to follow before having a successful setup. If all these procedures are not followed, most pictures taken will not be complete. For instance, you might come across pictures of heads of deer separated from their bodies. The above is a result of poor positioning of the camera.
Settings here are classified into two categories namely:
- Internal settings
- External settings
Internal settings
As the name implies, these settings are done inside the camera. These settings determine the accuracy of the camera. The major mistakes associated with the internal settings are as follows:
- Storage of Unnecessary Pictures:
One of the major things to do first immediately you get hold of your camera is to format your SD card. One of the easiest and least talked about mistakes is not re-formatting your SD card in your trail camera. When you don’t reformat your SD card, you are taking the risk of not having the pictures properly saved in your device.
When your SD card is used in different devices it will have formatting that matches those different devices, which can adversely affect the communication between your trail camera and SD card. In most cases, this leaves you with a lot of inaccessible or unreadable files.
If the pictures or videos in the SD card are very important, you can transfer them to your other mobile devices before formatting that is, if you are not using a cellular trail camera. If you are using a cellular trail camera, once connected with your phone, it will automatically send those pictures to you then you can easily format your SD card.
(2) Neglecting Other Minor Trail Camera Settings
The major mistake you can do is to assume that other settings in the camera are in place and are optimized for good performance. There is nothing more heartbreaking than realizing that the trail camera you set with high expectations of seeing pictures of humans or animals on your grounds was in video mode for the last couple of months instead of being in photo mode These are very regrettable mistakes that could be easily avoided if closer attention were paid to other minor internal settings.
Below are those minor things to check out when setting your camera:
– The Capture Mode
Setting the capture mode is quite very easy. It is either you want pictures or videos. Keep in mind that video files are bigger and will occupy more of your available memory card space compared to the picture file. More so, your camera will be working harder while recording videos causing battery life to deteriorate. If the capture mode is not properly set, it could affect your SD card and also affect your battery.
– The number of photo bursts and time intervals between photos
These refer to how many pictures you want to be taken at a time and how long of a delay you’d like between those bursts. Why it’s important to always check this is because every camera setup is different; most times, it depends on your aim and environment.
For camera setups over game trails, a higher burst is necessary and less delay since the animals will be walking through quickly. While for camera setups over mineral sites, the animals will be in front of the camera which means that you will probably have a higher chance of getting a picture so you can lower the photo burst and increase the time interval.
– The sensor sensitivity
The sensor sensitivity is basically what triggers the camera to take a picture. Every camera’s sensor sensitivity is different that is why it is very necessary that you test the camera before you put it up so you will know if you have to change the settings. This will help eliminate those unwanted pictures triggered by tall grass and trees blowing in the wind, so it either you reduce it or you increase it; whichever one you want. Once reduced, it will lessen the frequency of taking unwanted pictures because the sensitivity has been reduced to detect motion vice versa.
– Photo megapixels
This particular setting enables you to receive options. Most cameras will give you choices for megapixels whether you’d prefer the photos to be taken in higher pixels which definitely gives you a higher quality but which takes more space on your memory card. Lower megapixels give you a lower quality output that will occupy less space on your card. The decision is yours to make, it is just necessary that you have both megapixels tested so as to ensure they are in perfect condition and then select the one to use.
– Time and Date
Time and date seem like a simple thing, but a lot of people get wrapped up in all the other features trail cameras have that they forget to set the time and date. The time and date settings are like the most important settings especially when you are surveying for documentation and security purposes. Setting the date and time correctly gives you accurate details about whatever you need to know.
External settings
As the name implies, these settings have got a lot to do with the camera in relation to its environment. However, not doing this does not make the camera malfunction. The essence of doing this setting is just to get a satisfactory result. The major mistake associated with this include:
– The Placement/ Positioning of your Trail Camera
The placement of the trail camera is another major mistake most people tend to ignore. You feel you can just position your trail camera any way you like and expect it to capture good pictures? No! now, placement of the trail camera does not have to do with finding “high traffic areas” or placing your camera on very high trees and expecting it to give you the best caption. You might be disappointed with the result if you do that. What you are expected of you to do is to know the normal basics of proper wrapping around a tree.
Angles are everything. If you have the trail camera set too high up the tree, you’re only going to get pictures of ears and antlers. If the camera is set too low, you’ll have a lot of pictures of legs.
The best way to do this perfectly is to use your body measurement to wrap the camera. Here is what we are talking about: When you are in level ground, put the camera about ‘waist-high’ on the tree which is four feet off the ground level for an average-heighted person. This will make your camera capture clearer and complete pictures of anything. If you are hanging your camera on a tree that is slightly lower in elevation than the area you wish to capture, you might need to move the trail camera a bit higher up the tree so your eye levels with the animal to get a perfect capture.
It is also necessary to note that there is also the possibility of environment-induced factors. The environment in which your camera is set in could also contribute to the camera taking “blank pictures” Weeds and branches cause false triggers in trail cameras. Thousands of shots can be taken due to the rapid movement of trees and grasses due to wind action. But, there are some things trail camera users can do to significantly reduce them.
To reduce the capture of unnecessary pictures, simply clear any branches, weeds, grass, and other debris that could be moved by the wind within the camera’s detection range. Placing your cameras where there is less sunlight, especially in the detection area, will also help in the cause.
Why won’t my trail camera take night pictures?
Did you ever notice that your trail camera does not take pictures at nightfall? You’ve wondered what and what might be the cause of this.
It might interest you to know that the trail cameras are triggered by a combination of two factors. The first is what the camera must see which is movement or motion within the detection area. The second and less commonly known factor is ‘a variance in temperature’ which translates to the body heat of any human or animal that comes within the detection range. These are the two factors that always cause a trigger.
The process is the same regardless of the time be it either daytime or nighttime. The above means that there is no specific time a camera should trigger. If it triggers during the day, nothing should stop it from triggering at night too.
Here are some few things that can be checked when a problem of not taking night shutters is detected:
– The standard batteries manufactured for trail cameras are the Browning, Duracell or Energizer branded batteries. Always ensure you are using any of the above batteries. These batteries have standard alkaline or lithium which gives the camera enough power to function. They are mostly reflected by a percentage on the camera’s home screen.
– Always ensure that there are a lot of activities at night in the camera’s detection area.
– If you notice that your camera does not take pictures at night, you should perform a self-test by either moving around the camera detection area at night for several minutes. Better still, bring the camera into your home in a completely dark room so it can be ‘night’ tested at your convenience. After doing this, then view the SD card to see if the camera took pictures that will give you an idea of what to do next.
The information we have provided in this article should help you identify why your trail camera may be taking pictures of nothing or why it’s not taking night pictures. Ardently following the recommended steps will help you resolve the problem and continue having an interesting and beneficial experience. using your trail camera.