How to Set Up a Tarp By Yourself Like a Pro
Roughing it in the great outdoors is one of life’s greatest joys. But nothing can sour a camping trip faster than getting caught in an unexpected downpour with no shelter. We’ve all been there – frantically trying to string up a tarp as the skies open up. By the time you’ve got it secured, your sleeping bag and clothes are already soaked!
Not fun.
Luckily, with some advanced preparation, you can easily set up a tarp on your own to stay dry in any storm. In this post, I’ll walk you through the straightforward steps so you can quickly pitch a tarp like a pro.
First, choose a flat spot free of sharp rocks and sticks that could tear your tarp. Then, gather your simple supplies: tarp, poles, rope, and stakes. Attach the ropes to the poles before inserting them into the ground or stand. Next, clip the tarp to the poles so it’s pulled tight. Finally, anchor the corners with stakes to prevent flapping.
Voila – you now have an effective shelter ready to shield you from the elements. Setting up your tarp doesn’t need to be a panicked, soggy mess ever again. With the techniques I’ll cover today, you’ll stay bone-dry even in a downpour. So read on to learn the easy process that’s faster than scrambling for cover when the skies crack open. In no time, you’ll be a tarp pitching pro!
Choose the Perfect Location
Picking the right tarp location is the first key step for quick and easy setup. Here are factors to consider:
Flat Surface
Find a patch of level ground cleared of bumps, divots, and pointy rocks. This allows you to string up the tarp drum-tight. Uneven terrain creates sagging areas that collect rain.
Sturdy Anchor Points
You’ll need to securely tie off the tarp corners. Search for strong anchor points like tree trunks, boulders, or man-made structures. Avoid small branches or shrubs that can uproot in heavy wind.
Protect from the Elements
Position the tarp to shield yourself from the approaching storm. If the wind or rain is coming in from one direction, face the opening away from the inclement weather.
Mind the Surroundings
Look up and make sure no overhead branches or widow-makers can come crashing down onto your tarp. Also allow room to move around freely inside without hitting the edges.
Critter Considerations
Inspect the area to avoid pitching your tarp over ant hills or bee hives. Also check for signs of larger animals like bear tracks.
Gather Your Gear
Having all your tarp supplies prepped and ready to go is essential for quick setup. Here are the basic items needed:
- Tarp: Pick a lightweight, waterproof one that’s easy to pack. The size depends on your needs.
- Rope: Bring plenty of high-quality rope to create taught guy lines and tie-downs.
- Stakes: Pack rebar stakes for maximum hold in tough ground. Have backup stakes in case terrain is extra rocky.
- Poles: Collapsible hiking poles work well as tent poles. Adjust their extension for the right tarp height.
- Knife: Carry a sharp knife or multi-tool to cut rope to size.
- Work Gloves: Put on gloves to protect your hands from rope burn when tensioning the tarp.
- Head Lamp: If setting up at night or in dark storm conditions, a head lamp allows you to see what you’re doing.
Before heading into the backcountry, assemble all these items so they’re ready to grab at a moment’s notice when duty calls.
Prep the Poles
Preparing your poles ahead of time is an essential time-saving step for a fast tarp setup. Here’s how to pre-rig your poles:
- Take your hiking poles and extend both to the desired height. Lock them into place. This step prevents fumbling with pole adjustments in the rain.
- Tie a piece of rope to the top of each pole to create guy lines. Use a secure knot like a bowline or double half hitch.
- Adjust the rope length so the guy lines will reach from the pole to a strong tie-off point like a tree.
With pre-made guy lines already attached, your poles are now ready to quickly install and tie off once on site. Doing this prep work ahead of time shaves off precious minutes during tarp setup.
Install the Poles
Your prepared poles will make installing the actual tarp framework a breeze:
- Plant the poles vertically into the ground at least 6 inches. For extra stability, place rocks around pole bases if the earth is loose.
- If setting up on solid rock, use pole stands instead. Place pole tips into stand cups and adjust the metal teeth so poles stay upright when letting go.
- Position the poles the desired width apart depending on your planned tarp size. For example, most square tarps need poles 10-12 feet apart.
- Point the pole tips toward one another so they bow when the tarp is draped over them. This tension is what keeps the tarp upright.
- Check pole stability by pushing on them from multiple angles. They may need further securing with guide ropes staked down.
With poles firmly installed, you’re now ready to throw on the tarp!
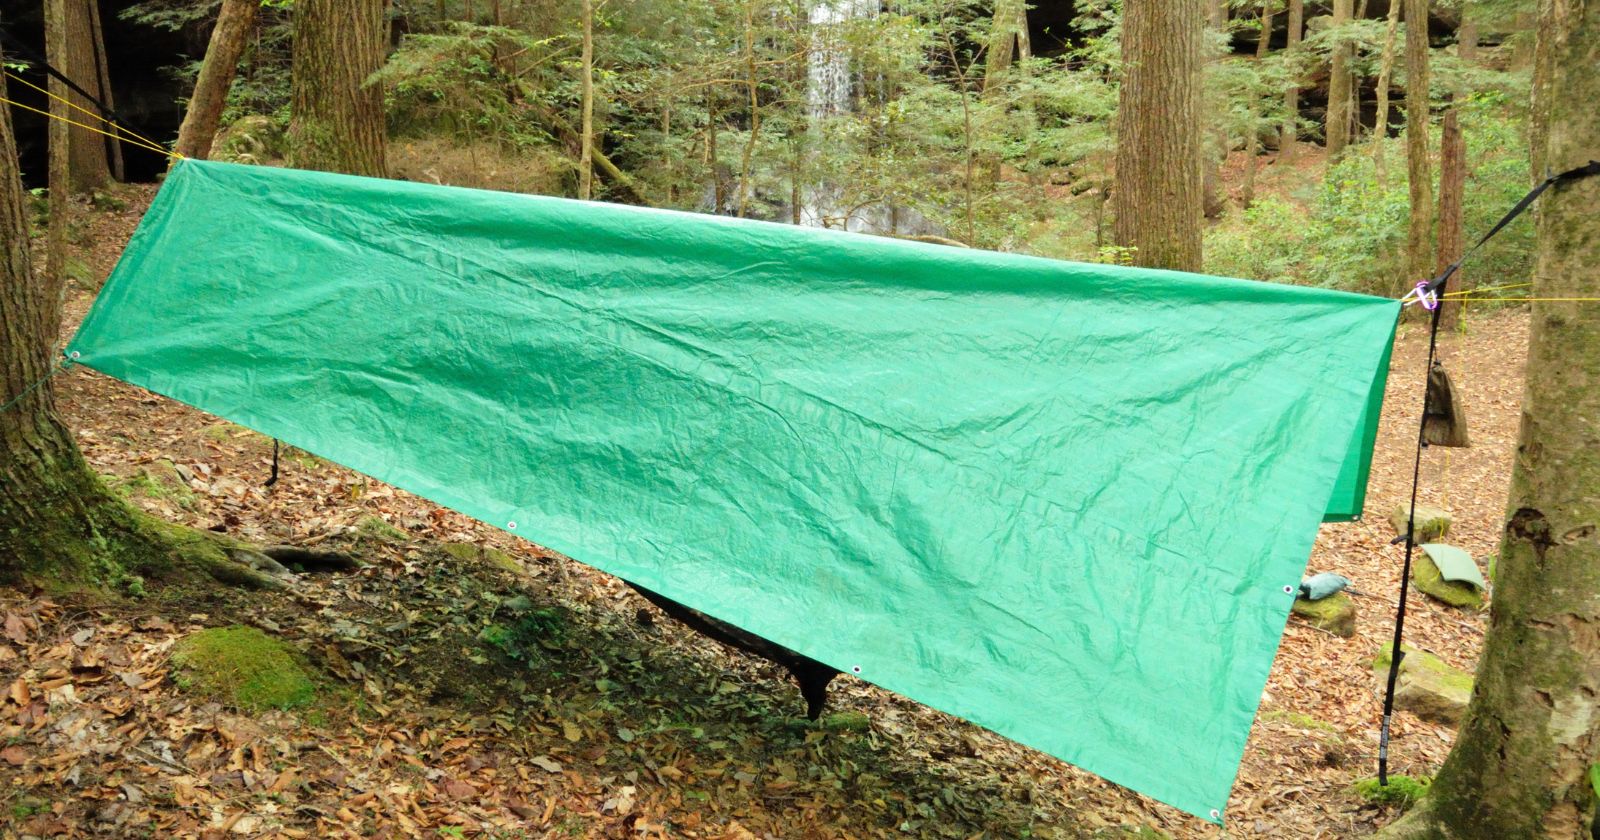
Attach the Tarp
Drape your tarp over the poles and start attaching:
- Throw the tarp over the poles, spreading it out corner to corner. The waterproof side should face up towards the sky.
- Pick one side and attach the tarp to the pole using a clove hitch. Repeat this knot on the opposite pole.
- Tie one corner off to a tree using a tension knot like a trucker’s hitch. Again do the same to the opposite corner.
- Go back and forth, attaching and tensioning opposite corners until the entire tarp is pulled taut from all sides.
- The final step is staking down any free edges still flapping in the wind so they don’t rip.
Drape and secure the tarp quickly before the skies open up. Now adjust any sagging areas by re-tensioning the corners. Your shelter is ready!
Perfect Your Pitch
With practice, you’ll be able to optimize your process to pitch a tarp rapidly and reliably:
- Set up cord systems beforehand: Use knots or clips to pre-attach guy lines to poles and pre-cut anchor ropes. This shaves off lots of setup time.
- Pack a tarp specific repair kit: Include spare rope, stakes, tape, and tie downs so you can fix any unexpected issues.
- Choose free-standing models: Tarps that don’t require staking down or trees to tie to are quickest to deploy.
- Stake it straighter: Putting stakes midway on each tarp side pulls it tighter and minimizes floppy edges.
- Angle it just right: Tilting the tarp to meet the incline of a hillside will prevent rain pooling.
Pitching a tarp solo is a crucial outdoor skill. Follow these techniques to get your shelter up quickly before storms roll in. With practice, you’ll get your setup procedure dialed so well that you can do it in the dark!
Set Up Different Tarp Configurations
Once you master the basics, a fun challenge is learning different ways to pitch your tarp. Mixing up tarp configurations expands your shelter options. Here are some useful arrangements to try:
A-Frame Pitch
This classic umbrella style works well for blocking wind and rain from one direction:
- Stake down the tarp midpoint on one side. Raise the opposite side and tie it off to a tree branch using a timber hitch.
- Tie the end corners off on an angle to form a steep roofline.
- For colder weather, lower the open side and build it up with stones or logs to block drafts.
Plow Point Pitch
This plow shape is ideal for stationary camps:
- Tie the tarp directly to two trees several feet off the ground.
- Let the sides drape all the way to the ground like a teepee to enclose the space.
- Stake down side edges to prevent flapping and seal any gaps.
Lean-To Pitch
This simple angled roof is fast and offers good weather protection:
- Tie one tarp corner off to a tree branch at least 7 feet high.
- Stake the other corner down on the ground 4-6 feet away.
- Weigh down side edges or tie off lower corners to create a triangular shelter.
Half Barrel Pitch
This partial dome shape adds lots of headroom:
- Tie a rope between two trees and drape the tarp over it.
- Stake down all 4 corners pulling edges outward to create a rounded roofline.
- For comfy head clearance, use hiking poles as vertical center supports.
Trying new pitching methods keeps your tarp skills sharp. Experiment to discover easy techniques that work for your unique camp situations.
Pick the Best Tarp Shelter Site
Even with an perfectly pitched tarp, the wrong site can still leave you soggy. Follow these tips to pick prime locations that will keep you high and dry:
Forest Floor: Pitch your tarp under dense tree cover to block rain. Bedding down on pine needles also keeps you drier.
Hillside Terracing: When camping on a slope, create flat platforms to pitch tents on using rock walls or logs.
Drainage Ditches: For better drainage, dig narrow trenches around your shelter to divert runoff. Layer gravel on the floor.
Above Ground: During wet conditions, pitch off the ground on platforms like fallen logs or boulders.
Cave Entrances: Take refuge from the rain by setting up your tarp across cave mouths and overhangs.
Among Boulders: Big rocks can act like walls to block wind. Set up your shelter in the protected spaces between them.
Paying attention to site selection gives your tarp a fighting chance against the elements. Scout locations with natural drainage and protection to stay dry.
Emergency Tarp Shelters
When caught off guard by sudden storms, quick thinking can save you using on-hand materials:
Tarp Poncho: Drape a tarp over your shoulders like a cloak and hunker down under a tree until passing showers end.
Debris Hut: Lean branches, bark, and leaves against a fallen log to form a makeshift shelter. Cover the pile with a tarp or blanket.
Tarp Tent: Tie a tarp between trees as an overhead roof. Wrap the edges around trunks to enclose the sides. Stuff debris into gaps.
Lean-To: Lash a tarp to crossed branches wedged between rocks or heavy logs. Create an angled shelter.
Tarp Cave: Find a boulder, fallen tree, or embankment to use as a back wall. Prop up the sides with branches and cover with a tarp.
Tarp Burrito: Cocoon yourself and your gear inside a tarp on open ground. Close off the edges with rocks or tree debris.
In a pinch, any shelter is better than no shelter. Use a little Yankee ingenuity to make basic tarp tents until you can reach safety.
FAQs
Q: What size tarp should I get for 1 person?
A: An 8×10 foot tarp is a good minimalist size for solo campers. For more coverage, go up to 10×12 feet. Rectangular tarps give you more versatile configurations.
Q: How do I make sure my tarp stays taut overnight?
A: Reinforce tie downs before bed as rope can loosen over time. Use traps and extra stakes to keep the tarp material tight. Check it periodically and tighten corners as needed.
Q: What are the best knots to use for tying a tarp?
A: The bowline, clove hitch, trucker’s hitch, and taut-line hitch are all useful secure knots. Learn how to tie them beforehand for easy adjusting and holding power.
Q: Can I use a tarp instead of a tent in cold weather?
A: Yes, but you’ll want to pitch it low, angle walls inward, and build up insulation along the edges to contain heat. Use a thermal ground tarp and sleeping pad.
Q: What do I do if my tarp gets damaged while camping?
A: Always pack repair supplies like ripstop tape, seam glue, spare ties, and a tube of silicone in your kit. Know basic patches using tape and grommets to get home safely.
Staying dry in the wilderness takes some smart planning and techniques. But with the skills covered in this guide, you now have an expert system to pitch a tarp with total confidence. Use these tips to quickly create reliable shelter against the elements on your own terms. Most importantly, don’t let uncertain weather ruin your camping trip when you have a trusty tarp ready to deploy.