How Do You Set Up a Wireless Trail Camera?
Trail cameras are one of the most prized possessions of people who enjoy hunting or love to monitor their property for people and animals passing by. Currently, wireless trail cameras are one of the most widely used tools for documenting targets because of their versatility. But the big question here is: how do you set up a wireless trail camera?
Wireless trail cameras can be set up by first programming the camera for full functionality using the manual it came with. Setting them up also involves mounting them at the right places, the right way, for maximum footage.
The setting up of a wireless trail camera is not much different from the setting up of normal trail cameras. In the rest of this article, we will be providing you with valuable information on how to set up your wireless trail camera. Let’s delve in!
How do you set up a wireless trail camera?
Knowing how to set up your trail camera is an essential part of the entire trail camera experience because how you set it up is critical in getting the right information about targets. If your setup is poor, your expected output will be hampered; there will be missed photos and videos.
Taking your time to study and understand how to set up your wireless trail camera can help you prevent bad and incomplete images, blurred images, and unclear videos.
We will be showing you a well-detailed step by step guide on how to set up your trail camera to avoid the consequences that come with improper setup.
Unboxing your camera
This is the first step in setting up your wireless trail camera. After you have purchased a wireless trail camera like the Bushnell Aggressive Trophy Cam or any other one, the next thing you need to do is to open up the pack to reveal its contents.
The box should come with an instructional manual explaining the process involved.
Normally, the basic instructions will look like this:
- Slot in batteries and add an SD card.
- Update the camera’s firmware to the latest version available.
- Test the settings to see which configuration you prefer.
- Test the unit in your house or property.
So you need to follow the steps on the manual to get it ready for action.
Note that before slotting in the batteries, you have to choose what type of battery to use except the camera is particularly suited for a certain type. The type of battery you choose will have a direct impact on how long your trail camera will last before the battery eventually dies. Some wireless trail cameras come with rechargeable NiMH batteries but this type of battery does not often last long. Cheap battery options usually have a shorter battery life span than the expensive ones like the lithium-based battery.
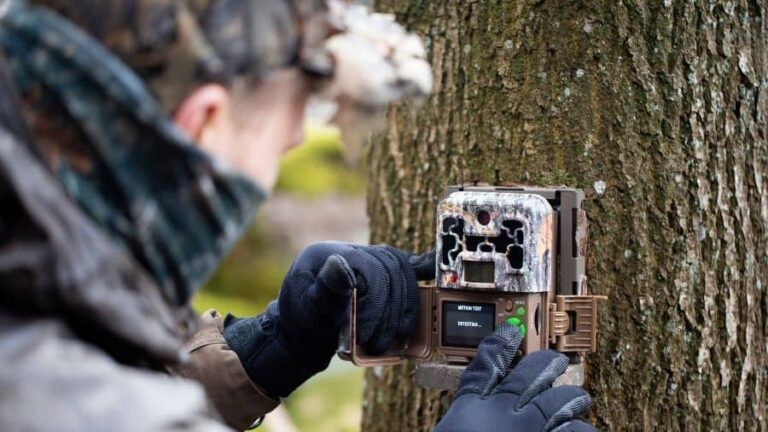
Switch on the camera
When you switch on the camera, the ‘set up’ mode comes up. When it does, you will find 4 different sets of navigation keys which you can use for setting up the camera.
When you press the ‘up’ navigation key, it allows the camera to capture videos of targets whether humans or animals. While pressing the ‘down’ navigation key activates the camera to take still images.
To trigger the shutter speed, continuously press the ‘right’ navigation button key until you get the speed you desire.
You can also make use of the menu setup option to adjust the default settings.
Register your camera online
After switching on the camera and familiarizing yourself with the various menu options, the next thing to do is to register your trail camera online.
Most modern wireless trail cameras have cellular capabilities and make use of a SIM card which also has subscriber plans. This is made possible by using the normal 2G, 3G, or even the latest 4G networks for the SIM card and Wi-Fi signals just like as is the case with mobile cell phones. Most wireless trail cameras work on AT & T wireless data networks.
Wireless trail cameras like the Bushnell Aggressor Trophy Cam come with prepaid one-month registration.
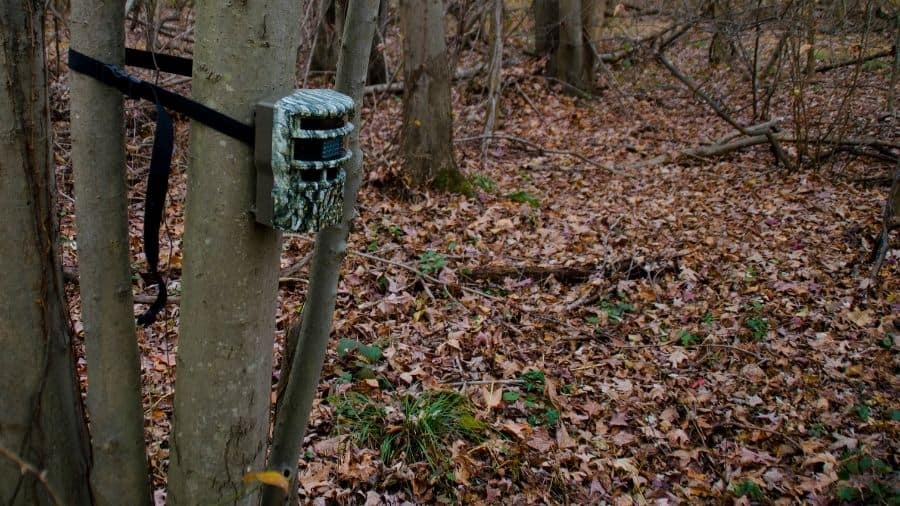
Mount your camera
This is the most crucial part of setting up your trail camera because how you mount your trail camera determines the type of shots that you will get, the frequency of the shots, and ultimately, how effective your intention of purchasing it will be.
When using them for security, trail cameras are better mounted at main gates, perimeter fencing, entry porches, doorways, open hallways, mailboxes, and where valuables are kept.
When the camera has been purchased for game watching/hunting, in determining which tree or where else to mount your wireless trail camera, there are a lot of factors to consider because, with a wireless trail camera, you do not need to constantly go out, wasting gas to check your trail camera.
We’ll be showing you some of the main factors to consider when mounting your trail camera for better effectiveness.
The bait site: This describes the most used trail camera site by hunters. In the bait site, you make use of food like corn as bait or a mineral attractant which helps to attract the target, deer for instance, into the sight of the trail camera. However, note that baits are illegal in some states.
When using a wireless trail camera the hunter must take caution in keeping the bait at the site. The use of Cube™ can help achieve this.
Ensure to mount the wireless trail camera within the camera’s detection distance where it can view any animal target in sight. Mounting it 30 feet from the bait site gives the trail camera a better chance of detecting, and capturing a full-body image of the target while also being close enough to take a clear night image. To avoid sun complications, the camera should be placed at breast-height, facing north.
Since you are using a bait site, when deer or any other animal gets attracted to the site, they will often spend a long time licking the bait. This means that you need to take three photos every one minute which would fill up your memory space faster. Instead, changing the setting to take a photo every five minutes depending on the first set of images would be better.
Mock scrapes: This is also a type of trail camera site, it is however not used as often as it should. A mock scrape also draws deer into the sight of a wireless trail camera and a tree stand which makes it legal.
However, mock scrapes have been proven to work best at night. Regardless, they make good locations to mount your wireless trail camera because they attract deer and are not considered bait. So installing a mock scrape can help you keep track of all deer around your property or hunt area.
To set up your mock scrape, look for a branch that hangs between 5 – 6 feet from the ground or hang one up yourself in a good area. Then, break off the end leaving a good part hanging. If the branch which hangs low is twisted or snapped, that’s an indication for a deer that a mock scrape is there.
Set your trail camera around 30 feet away which is far enough to take images of the deer on the mock scrape but not too close that it will spook the deer through the shadow of the camera.
Rut funnels: A rut funnel gathers information on the movement of deer and also on the hotspots where rutting takes place. This information, when sent directly to your email or phone can tell you when to go in and hunt them down. Note that mounting your trail camera at a 45 degrees angle gives it more time to capture movements while also being able to capture several fast-moving deer.
Food plot: Mounting a trail camera around food plots will enable one to monitor the pattern of what deer do around their source of food. When a wireless trail camera is set over a food plot, it is necessary to ensure that it faces the correct direction both vertically and horizontally. It is best to mount the camera at a 45-degree angle which will enable it to get clear footage of the food plot and also of the deer as it’s going into the plot.
Interestingly, successfully mounting a wireless trail camera is very essential at determining whether the money invested in it will be wasted or not. The use of secure mounting materials like bungee cords, steel straps, and other high-resistant materials is necessary as loose cameras can be stolen or destroyed by human targets. Wildlife targets can also make impacts on cameras with either their heads or antlers and could also damage them.
Command
This is the last procedure involved in setting up your wireless trail camera. It involves programming the device on how you wish to receive your images or videos. You may decide to receive them either through Facebook, your email, directly to your phone, or via the web (for a wireless trail camera with cellular function) or simply via Wi-Fi connection for a normal wireless trail camera.
How do wireless trail cameras work?
Since the invention of trail cameras, users or owners have always gone out to where their cameras were mounted to get the information off their camera through the SD card. Further advancement in technology and the evolution of these trail cameras saw the need for them to become wireless. What this means is that wireless trail cameras are more like a combination of both your normal old-fashioned trail cameras and a smartphone. These new types of trail cameras have the manufacturer’s factory-installed transmitter or an in-built Wi-Fi signal.
In this part of this article, we would look more at how these modern-day wireless trail cameras operate or work. But before we begin, you need to understand that a wireless trail camera is not the same as a cellular trail camera, although they share a lot of similarities.
Wireless trail cameras make use of an advanced technology that gives them an edge over cellular trail cameras. However, in some cases, some wireless trail cameras have the abilities that a cellular trail camera possesses.
What differentiates a wireless trail camera from the cellular trail camera is that the wireless trail camera makes use of a Wi-Fi signal to transmit photos and videos, but a cellular trail camera uses a SIM card powered mobile network to transfer photos and videos directly to your phone or email.
Now, we shall begin with how a trail camera works. Wireless trail cameras come with a routine Passive Infrared (PIR) sensor that detects a change in motion or a change in the temperature of the area within their wide field of view.
After mounting it on the preferred spot, when a wireless trail camera detects a temperature change either at daytime, low light, or night time, it activates the remaining part of the camera triggering a fast response (which is referred to as trigger speed) capturing whatever is within its field of view.
Once that image is captured, it is automatically saved either in the inbuilt memory or in the SD card while the camera returns to its dormant mode for about two minutes unless another movement is detected. However, the time it takes for a wireless trail camera to go back to its sleep mode differs between trail cameras and the set up of each trail camera.
The captured image or video that was recorded can be accessed by the user over a Wi-Fi connection. The user must be at a reasonable distance from the trail camera as specified by the trail camera manufacturer. Usually, this distance is between fifty feet or 15m to about a hundred feet or 30m.
For the recorded information to be properly accessed by the user, the trail camera, and the receiving computer or phone must be on the same shared Wi-Fi. This network operates on a data plan allowing the user to download the contents of the SD card.
This data plan can vary between users, but it must be able to successfully access the contents on the camera and then download, the pictures or videos to the receiving computer or phone. The speed of this download process will also vary between trail cameras and the network provided. The speed of the network is either 2G, 3G, or 4G network. For fast and easy download, use a 4G network.
When using a wireless trail camera, your source of the power supply must be sufficient enough to keep it working for a reasonable length of time. Using only AA lithium or alkaline battery to run it would cause a need for the rapid replacement of the battery, which might ruin the peace and tranquility of the surrounding area of the camera thus increasing the chances of the camera being noticed by either human or animal targets.
To use trail cameras especially for security purposes, it is most preferable that they have a backup solar power supply. With this type of power, you can be sure your camera would last a long time.
Some trail camera users would also prefer to use power gotten from a DC (Direct Current) source to operate their wireless trail camera because of its almost insatiable need for power. This is also a better way of powering wireless trail cameras than relying on lithium or alkaline batteries only.
A simplified step-by-step guide on how wireless trail camera works is as follows:
– Turn on the camera.
– Position it in your preferred location.
– When a motion is detected by the PIR, a trigger is sent to the camera which captures the image or records a video of what is within its sight.
– The captured image or recorded video is then stored on the SD card of the trail camera and can be accessed over a Wi-Fi connection which is a feature of the ‘wireless’ trail camera.
– You can now transfer the images and videos to your phone or personal computer using the Wi-Fi connection as long as you within the network coverage range.
Best Wi-Fi trail camera
Just like everything else in our daily lives, technology and its constant advancement has made things easy for us. The same goes for trail cameras. The evolution of wireless trail cameras has made it easier for them to be used for either security or game watching/hunting.
The recorded information can be received remotely without the user having to visit the camera frequently. This saves time, energy, and other resources and is particularly effective as there is a minimized chance of the target getting scared or spooked.
When searching for the best Wi-Fi trail camera out there on the market, there are a lot of factors to consider. The determining factors of which camera is the best depends on the quality of images produced, data plan affordability, and ease of setup and use.
In this section of this article, after due research, we have come up with the overall best Wi-Fi trail camera for those without budget constraints and also for those on a budget. Let’s delve in!
Best overall Wi-Fi trail camera
Based on the consideration of the factors highlighted above, the wireless trail camera wins the day is the CreativeXP wireless trail camera.
When it comes to the best wireless trail camera out there on the market, this is it. The CreativeXP LTE 4G trail camera is the best option. This camera features full-HD night vision and is cable of taking incredible crisp images and videos at any hour of the day or even the night.
The CreativeXP LTE 4G is our best wireless trail camera because of its features which include:
– Affordable data plan
The aim of the manufacturers of the CreativeXP Wi-Fi trail camera is to enhance its affordability. This camera comes with a SIM card that makes use of the AT & T network and an SD card of 32GB. A data plan which gives you 1,500 images can be purchased for just under $10.
– Easy to set up and use
The CreativeXP 4G LTE trail camera comes with a motion-activated sensor and several pictures and video settings. This wireless Wi-Fi trail camera can satisfy your need for surveillance without a headache or stress.
Setting up this camera is super easy as the instructions provided are easy to follow. However, if you need help with setting the camera up, you can call the company’s phone number, and a customer service representative would put you through.
– Crystal clear images and videos
The CreativeXP 4G LTE trail camera has a full HD night vision function with a range of 65 feet that delivers amazing images with a 12MP and videos at 1080p in the lowest of light conditions. These images are then sent instantly to your phone or your email via Wi-Fi connection.
– Life-long warranty
The CreativeXP trail camera is designed to survive hard weather conditions such as extreme sunlight, rainfall, and snow. It can be connected to a compatible CreativeXP solar system panel that will supply it with constant energy. More so, should you not be satisfied with this product for any reason, you are covered by a life long warranty.
Specifications:
Photo resolution quality: 12MP
Video resolution quality: 1080p
Night vision: YES
Night vision range: 65 feet
Wi-Fi: YES
SD card: YES. Up to 32GB
Solar: YES. Compatible with solar panels.
You can check out the CreativeXP wireless trail camera on Amazon
Best Wi-Fi trail camera on a budget
After considering the wireless trail camera that has good functionality while still being reasonably-priced. The camera that makes it for us is the Campark T80 wireless trail camera. It wins the day because of the following factors:
- Easy to set up and use
The Campark T80 Trail Camera from the stables of Campark comes with a lot of critical features and capabilities for an ideal wireless trail camera. It is designed for the modern photographer.
Its 20MP camera gives you, the user, an amazingly captured image of any target that passes its sight. The parts are easy to assemble and install and the setup instructions contained in the user manual are simple and clear.
- Crystal clear images and videos
With image quality provided by the 10MP and a 1296p video quality, you are sure of crystal clear images every time.
It has an in-built Wi-Fi and app feature that lets you access images on the camera from your phone, and even adjust the angle of the camera. It has an advanced night vision feature with a 36pc 840nm IR LED that has a range of up to 65 feet.
The Campark T80 wireless trail camera also comes with a 1296 pixel powered video quality that produces a super clear sound recording video. The video begins recording the moment movement or motion is detected from a target.
- Durability
It is one of the few budget cameras to come with IP66 waterproof technology that helps it survive extreme weather conditions and environments. The rugged casing of this camera will keep your captured images and footage safe in its water and weather-proof case. Its high durability will give you the necessary longevity and reliability that you need all season long.
Included in the Campark T80 wireless trail camera box, is the camera itself, a user manual, a USB cable, a belt for mounting the camera, and a threaded tripod.
Specifications:
Camera resolution quality: 20 MP
Video resolution quality: 1296 pixel
Audio: YES. Clear sound audio.
Night vision: YES. Black and white image capturing
Night vision distance: Up to 20m (65ft)
Solar: NO
Wi-Fi: YES.
SD card: YES
Safe distance monitoring: YES.
Motion sensor: YES
Photo-quality resolution: 20MP, 16MP, 12MP, 8MP, and 5MP
Video quality resolution: 1296P (1728×1296, 30fps), 1080P (1920×1080, 30fps)
Night Vision: 20m
Infrared flash: 36-pcs IR LEDs (850nm)
Screen: 2.3 inches color TFT LCD
USB type: Mini USB 2.0
Video record Length: 10-60seconds / 1-3 minutes
Waterproof casing rating: IP66
Maximum battery capabilities the Campark T80 wireless trail camera is achieved by using 8 pieces of 1.5V AA battery.
You can check out the Campark T80 wireless trail camera on Amazon
This selection of the best wireless trail camera and the best on a budget is based on key specifications such as their capabilities, user experience, and popularity among seasoned photographers and hunters across the globe. We are quite convinced that you won’t go wrong when you decide to purchase any of them.
Summarily, we will advise you to search for more user reviews of the above wireless trail cameras and wireless trail cameras generally to read what other users have got to say. That way, you will be better positioned to understand your camera more and you will also learn about more titbits and tricks to get an experience that will keep you satisfied with that wireless trail camera.